Step 1: Receipt of Your Access Code
First, an email is sent to you by Nexam. This email contains your unique access code to register on the platform. Your access code will be valid for a period of 7 days.
Step 2: Connecting to the Platform
Next, you need to click on the connection link provided in the email to access the platform. You will be redirected to the login area, where you will need to enter your access code. The login address is as follows: https://app.nexam.io/connexion/code-invitation
Step 3: Acceptance of Terms
You will be prompted to create a password for your future connections to the platform. Your password must meet the following criteria:
- Include at least one lowercase letter
- Include at least one uppercase letter
- Include at least one digit
- Be at least 8 characters long
Afterwards, you will need to accept the Terms of Use and the Privacy Policy. By accepting these terms, you agree to use the online exam platform only for authorized purposes.
Once you have selected your password and accepted the terms, you will be prompted to log in to Nexam using your new password.
Step 4: Access to the Personalized Dashboard
The “Dashboard” displays your upcoming digital exams as well as those you have already submitted for correction. Upon your first login, you will have access to a practice simulation lasting a few minutes on your “Dashboard” to familiarize yourself with the Nexam environment. For some exams, this practice simulation is mandatory.
Before starting the practice simulation, you need to validate your computer's configurations.
Step 5: Validation of Required Configurations
To assist you, Nexam provides a tab called “Validate Your Device.” Under this tab, you can perform validation of technical specifications such as video sharing (screen sharing, camera sharing), internet connection speed, document display, and writing environment.
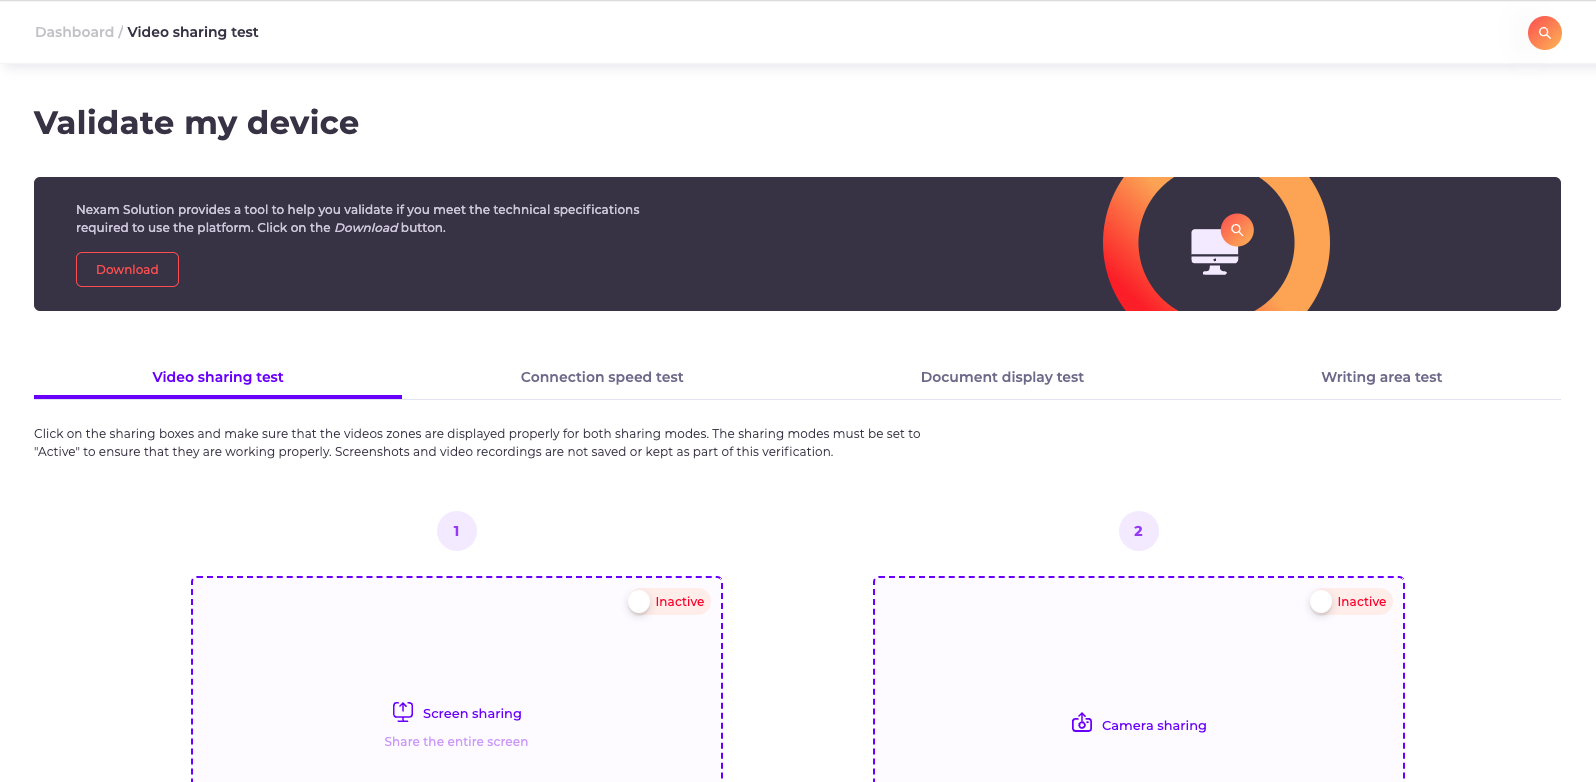
If you need to validate the technical specifications, Nexam offers a validation tool available in a banner under the “Validate Your Device” tab in the “Dashboard.” Simply click on the “Download” button to use this tool. (For additional assistance at this stage, please refer to the article available here).

Step 6: Profile and Password
From the “Dashboard,” you can access your profile and change your password.
Step 7: The Official Exam
To begin writing an exam, here are the steps to follow on the day and at the scheduled time of your appointment:
- Log in to the Nexam platform using the Chrome browser.
- On your “Dashboard,” click on the “Start” button corresponding to your exam. This button will appear at the scheduled date and time of the exam.
- If applicable, activate screen sharing by selecting “Entire screen” and activate video capture through webcam.
- Accept the Terms of Use and click the “Next Step” button at the bottom of the page.
- Carefully read the instructions page and check the required certificates.
- Click the “Start Exam” button.
- Confirm the start of writing by clicking “OK”.
✅ TIP: On the morning of the exam, we recommend restarting your computer if you don't do it daily. We also suggest referring to the article on the latest checks to perform before the official exam.
***
Nexam allows you to securely administer and grade exams online, in the classroom, or remotely.
Nexam is the preferred platform for regulatory bodies, associations, government agencies, and educational institutions. Visit our website at Nexam.io!